
📑 Table of Contents ▶
- The Essentials of Open-Face Tuna Melt
- Fundamentals
- Preparation/Setup
- Directions
- Mastering the Technique of the Open-Face Tuna Melt
- Technique
- Tips and Tricks
- Perfecting Your Open-Face Tuna Melt
- Perfecting Results
- Troubleshooting/Variations
- Serving Your Open-Face Tuna Melt
- Serving/Presentation
- Pairings/Storage
- Conclusion
Open-Face Tuna Melt
Seafood dishes bring a special comfort that resonates with both nostalgia and innovation. The open-face tuna melt embodies this perfectly. Growing up by the coast, canned tuna often made its way onto our dinner table, transforming into various delightful meals. This particular recipe brings together simple ingredients to create a dish that’s not only satisfying but incredibly easy to prepare.
The blend of creamy mayonnaise, crunchy celery, and savory onion enriches the tuna, making each bite a symphony of flavors. Toasted bread acts as the sturdy base, while the golden, bubbly cheese on top adds a wonderful layer of indulgence. Families often find themselves lingering over a tuna melt, sharing stories and enjoying the warmth of the moment.
An open-face tuna melt captures the essence of coming together and enjoying food that feels both homemade and comforting. Whipping this up takes no time at all, making it an ideal option for lunch or a casual dinner. Dive into this recipe, which not only satisfies hunger but also evokes fond memories of seaside gatherings and cozy kitchens. Let’s get started!
The Essentials of Open-Face Tuna Melt
Fundamentals
To create the perfect open-face tuna melt, understanding the fundamentals is key. Canned tuna serves as the star of this dish, and selecting a high-quality brand can elevate your meal. This ingredient brings a delightful seafood touch that pairs perfectly with the other elements, bringing layers of taste to each bite.
The creamy mayonnaise acts as a binding agent in your mixture. It adds richness and moisture, ensuring the tuna remains flavorful and not dry. Celery and onion introduce a refreshing crunch, enhancing the texture and overall experience of the dish.
Using toasted bread as the base is also essential. It provides a solid foundation for the toppings while adding a delightful crunch that contrasts with the creamy tuna mixture. Finally, melted cheese on top brings everything together, creating a gooey, indulgent finish that’s hard to resist.
Preparation/Setup
Preparation is simple and straightforward. Start by preheating your oven or broiler, ensuring it reaches the right temperature for melting the cheese. This step is crucial for achieving that perfect bubbly golden layer on top.
Next, gather all your ingredients and utensils. You’ll need a bowl and a baking sheet ready to go. Mixing the canned tuna, mayonnaise, chopped celery, and chopped onion in a bowl is the next step. Season generously with salt and pepper to bring out the flavors. The result is a creamy filling bursting with flavor and texture.
Once you’ve prepared the mixture, set your toasted bread on the baking sheet and top each slice with a generous spoonful of your tuna mixture. Layering the cheese on top ensures a satisfying melt over the tuna, creating an appealing dish.
Ingredients
Gather the following ingredients for your open-face tuna melt:
- Canned tuna
- Mayonnaise
- Chopped celery
- Chopped onion
- Salt
- Pepper
- Toasted bread
- Cheese (slices or shredded, such as cheddar)
These simple ingredients come together to create a dish that’s as comforting as it is delicious. Each element plays a vital role in transforming canned tuna into a warm and satisfying meal.
Directions
- Preheat your oven or broiler.
- In a bowl, mix together the canned tuna, mayonnaise, chopped celery, chopped onion, salt, and pepper.
- Place the toasted bread on a baking sheet.
- Spoon the tuna mixture onto each slice of bread.
- Top with cheese.
- Place under the broiler for a few minutes until the cheese is melted and bubbly.
- Serve warm.

Mastering the Technique of the Open-Face Tuna Melt
Technique
Mastering the technique involves understanding the timing and temperature for broiling. Broiling is a great method as it cooks the top of your dish effectively, allowing the cheese to melt quickly while the bread remains toasty.
Keeping an eye on the tuna melt while it broils is essential. The cheese can go from perfectly melted to burnt very quickly, so stay close and adjust the time as needed.
Additionally, mashing the tuna filling slightly before spreading it on the bread can create a smoother texture, which can help with even coverage.
Tips and Tricks
To enhance your open-face tuna melt, consider adding a few extra touches. A sprinkle of paprika can add a vibrant color and a hint of spice. For those who enjoy a bit of zest, a squeeze of lemon juice adds brightness and cuts through the richness of the filling.
Mixing in other ingredients such as diced pickles or capers can introduce unique flavor profiles. If you enjoy a touch of heat, consider incorporating diced jalapeños or sriracha into the mixture for an unexpected kick.
If you’re preparing multiple melts, consider using various cheeses to experiment with flavors. Mozzarella provides a stretchy texture, while pepper jack can add a spicy heat that elevates the dish.
Perfecting Your Open-Face Tuna Melt
Perfecting Results
To achieve perfect results with your open-face tuna melt, focus on the balance of flavors. Ensure the tuna mixture isn’t overly mayonnaise-heavy, as this can overpower the other ingredients. The goal is a creamy texture that enhances rather than masks the tuna’s flavor.
Moreover, slicing the onions and celery finely allows them to meld into the filling better, providing a more cohesive mouthfeel. Toast the bread for just the right amount of time, ensuring it’s golden brown but not too hard, as it should still be able to hold the creamy topping without getting soggy.
Troubleshooting/Variations
Should your cheese not melt properly, it might be due to the distance from the broiler. Adjust the shelf height as needed to get the optimal melt. If the mixture seems dry, you may need to add a touch more mayo or even a splash of water to generate a smoother consistency.
Variations can also be quite fun. If you’re not fond of traditional tuna, consider using canned salmon for a unique twist. Each swap can give you a different flavor experience while maintaining the essence of the dish.
Serving Your Open-Face Tuna Melt
Serving/Presentation
Serving your open-face tuna melt can be just as fun as making it. Consider garnishing the plate with fresh herbs like parsley or chives to add color and freshness. Cutting the toasted bread into smaller pieces can turn this dish into an appetizer for gatherings.
Pairing with simple sides like a fresh salad or crispy fries can create a delightful meal. This presentation not only looks appealing but also enhances the overall experience of enjoying the dish.
Pairings/Storage
While enjoying your open-face tuna melt, opt for simple sides, like a crisp slaw or a bowl of vegetable soup, to round out the meal. Steam some vegetables or toss a quick salad for a refreshing contrast to the rich and cheesy melt.
For storing leftovers, carefully wrap the melts in foil or place them in an airtight container if you’re preparing them ahead of time. They can be stored in the refrigerator and reheated in the oven to regain that crispy texture.
Conclusion
The open-face tuna melt brings together simple ingredients and vibrant flavors. It mirrors the ease of coastal cooking, providing a meal that is quick to prepare yet comforting. Embracing this recipe means inviting a piece of culinary tradition into your home, where flavor and simplicity harmonize beautifully. Enjoy it warm, and let each bite remind you of the joys that come from good food shared with loved ones.
Print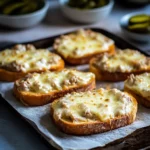
Open-Face Tuna Melt
- Prep Time: 10 minutes
- Cook Time: 5 minutes
- Total Time: 15 minutes
- Yield: 4 servings
- Category: Lunch
- Method: Broiling
- Cuisine: American
- Diet: None
Description
A comforting open-face tuna melt featuring creamy tuna, crunchy celery, savory onion, and gooey melted cheese on toasted bread.
Ingredients
- 1 can Canned tuna
- 2 tablespoons Mayonnaise
- 1/4 cup Chopped celery
- 1/4 cup Chopped onion
- Salt, to taste
- Pepper, to taste
- 4 slices Toasted bread
- 1 cup Cheese (slices or shredded, such as cheddar)
Instructions
- Preheat your oven or broiler.
- In a bowl, mix together the canned tuna, mayonnaise, chopped celery, chopped onion, salt, and pepper.
- Place the toasted bread on a baking sheet.
- Spoon the tuna mixture onto each slice of bread.
- Top with cheese.
- Place under the broiler for a few minutes until the cheese is melted and bubbly.
- Serve warm.
Notes
For added flavor, consider mixing in diced pickles or capers. A sprinkle of paprika can enhance the appearance and flavor.
