📑 Table of Contents ▶
Crunchy Roll Sushi Recipe
Creating sushi has always felt like a celebration in my kitchen. Some of my fondest memories revolve around preparing this marvelous dish, where flavors collide and textures excite the senses. Crunchy roll sushi captures that beautifully and offers a delightful crunch with every bite.
Each time I delve into making these rolls, I’m reminded of family gatherings where everyone joined forces to make sushi together. The laughter, the chatter, and, of course, the endless experimenting with flavors turn the sushi-making process into a joyful adventure. Crunchy roll sushi stays a favorite because it’s fun, customizable, and showcases the vibrant colors of the ingredients.
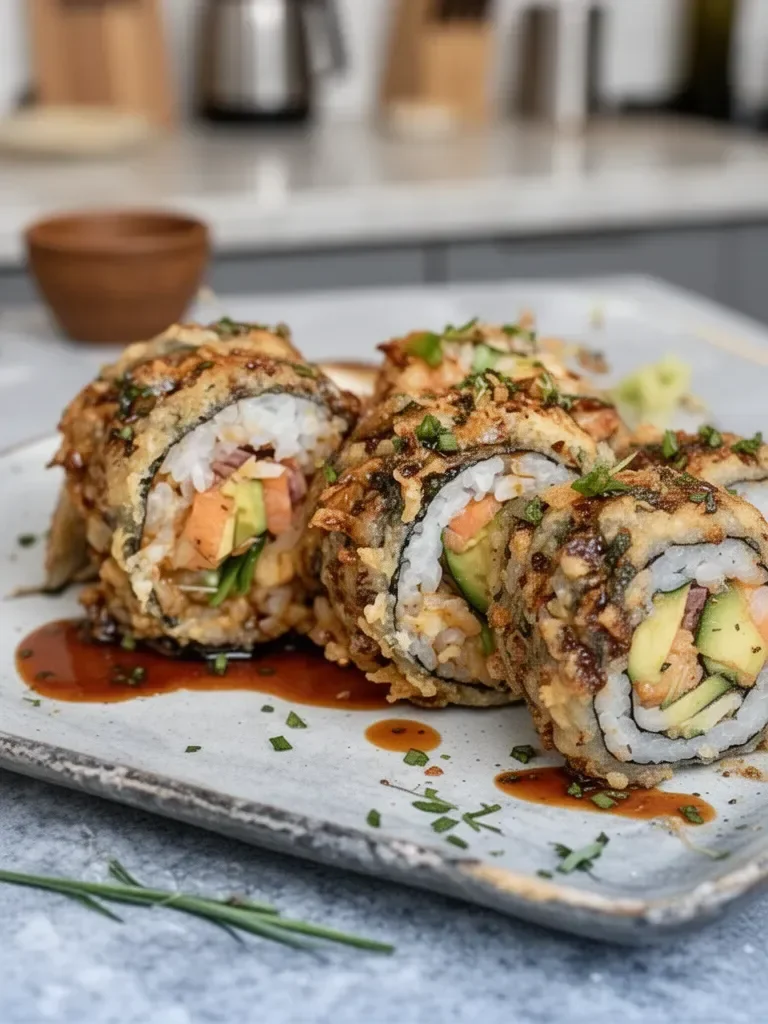
Unlike traditional sushi, crunchy rolls incorporate dynamic textures, primarily the golden panko breadcrumb coating and the delightful crunch of tempura flakes. With this recipe, you can create a sushi masterpiece in your own home. Made with sushi rice, nori sheets, fresh vegetables, and an irresistible crunchy coating, every roll turns into a delicious treat that leaves everyone wanting more.
Let’s embark on this sushi-making journey together!
Crunchy Roll Sushi Fundamentals
Fundamentals
Understanding the basics of making crunchy roll sushi sets the stage for a successful culinary experience. The star of the show is the sushi rice, which acts as a base for all your delicious fillings. This sticky rice, seasoned with rice vinegar, sugar, and salt, binds everything together in perfect harmony.
Tempering the sushi rice enhances the flavor profile. Mixing in a bit of sweetness from the sugar and a hint of tanginess from the rice vinegar elevates the dish. This balance creates the perfect base for your fillings, allowing the flavors of the cucumber and avocado to shine through.
Preparation/setup
Preparation is key when it comes to making sushi at home. Start by rinsing the sushi rice under cold water. This step rinses away excess starch, ensuring a great texture. After rinsing, soak the rice for about thirty minutes, which further refines the texture.
Once you’ve soaked the rice, cook it following the instructions on the package. After cooking, allow the rice to cool slightly. In the meantime, mix the rice vinegar, sugar, and salt in a small bowl to create the sushi seasoning. You will need this mixture to blend seamlessly with the rice.
As you combine the cooled rice with the seasoning, gently fold and cool it using a fan or a spatula. This technique gives the rice a shiny appearance while maintaining its sticky consistency.
Ingredients
To make crunchy roll sushi, gather the following ingredients:
- 2 cups (400g) sushi rice
- 1/3 cup (80ml) rice vinegar
- 2 tablespoons (25g) sugar
- 1 teaspoon salt
- 4 nori seaweed sheets
- 1 cucumber (julienned)
- 1 avocado (sliced)
- 1/2 cup (50g) tempura flakes
- 1 cup (100g) panko breadcrumbs
- 2 tablespoons vegetable oil
- 1 tablespoon soy sauce
- 1 teaspoon maple syrup or agave nectar
- Soy sauce and pickled ginger for serving
With these fresh ingredients, you’re ready to create a delightful sushi experience.
Directions
- Prepare the sushi rice by rinsing and soaking it for thirty minutes. Cook according to package instructions.
- Combine rice vinegar, sugar, and salt in a bowl, mixing until dissolved.
- Once the rice has cooled slightly, gently combine it with the rice vinegar mixture, folding it carefully.
- Prepare the crunchy crust by mixing the panko breadcrumbs with vegetable oil. This creates a golden, crispy texture.
- Lay out a nori sheet on a bamboo mat, shiny side down. Wet your hands and spread an even layer of sushi rice over the nori, leaving about an inch at the top edge.
- Add a line of julienned cucumber and avocado in the center of the rice.
- Sprinkle a generous amount of tempura flakes over the veggies, enhancing the crunchy factor.
- Carefully roll the sushi away from you, using the mat to guide it. Press gently but firmly as you go.
- Seal the edge with a bit of water.
- Coat the outside of the roll with the panko mixture and pan-fry in a skillet over medium heat until golden brown.
- Slice the roll into bite-sized pieces.
Crunchy Sushi Roll Technique
Technique
Mastering the sushi roll technique gives you the freedom to experiment with flavors and ingredients. A tight, even roll ensures each bite offers a delightful mix of textures. Use the bamboo mat for an excellent grip and control as you roll. The key here is to apply just the right amount of pressure, securing the fillings while not squishing everything together.
When adding the fillings, make sure to not overload the roll. A well-balanced filling yields a sushi roll that stays intact and offers delightful bites. The tempura flakes and panko breadcrumbs added at the end give the sushi a distinct crunch, elevating your rolls to a new level of deliciousness.
Tips/tricks
Here are a few tips for achieving the best crunchy roll sushi:
- Ensure your hands are damp while handling the sushi rice. This prevents sticking and maintains the rice’s shape.
- Use quality sushi-grade fish or fresh vegetables to enhance flavor.
- Experiment with additional fillings that can complement your sushi, such as carrots, bell peppers, or even mango for a fruity twist.
- Practice your rolling technique. The first rolls may not look perfect, but with practice, you’ll achieve that polished appearance.
Perfecting Crunchy Sushi Roll Results
Perfecting results
To perfect your crunchy roll sushi, focus on the freshness of your ingredients. Use ripe avocado for a creamy texture and a slightly crunchy cucumber. These ingredients not only taste great but also enhance the visual appeal of your dish.
Additionally, controlling the temperature of your cooking oil is crucial. When frying the panko-coated rolls, ensure the oil has heated sufficiently for the perfect crispy exterior. Use a thermometer if needed to get the oil just right.
Regularly check your rolls while they fry to prevent burning. You want a golden, even color, indicating a deliciously crunchy exterior.
Troubleshooting/variations
If you encounter issues with your sushi, don’t fret. Here are some common problems and their solutions:
- Sushi rolling falls apart: Double check the amount of water you’re using to seal the roll. A good seal helps hold everything together. Make sure not to overload the fillings too.
- Rice becomes mushy: This may occur if you haven’t rinsed the rice properly. Ensure you rinse it until the water runs clear before cooking.
- Panko doesn’t stick: Consider adding an extra layer of rice outside the roll before coating it with panko for more adherence.
Feel free to play with different variations of ingredients. You can create a spicy mayo to drizzle atop the sushi or use other veggie options for unique flavors!
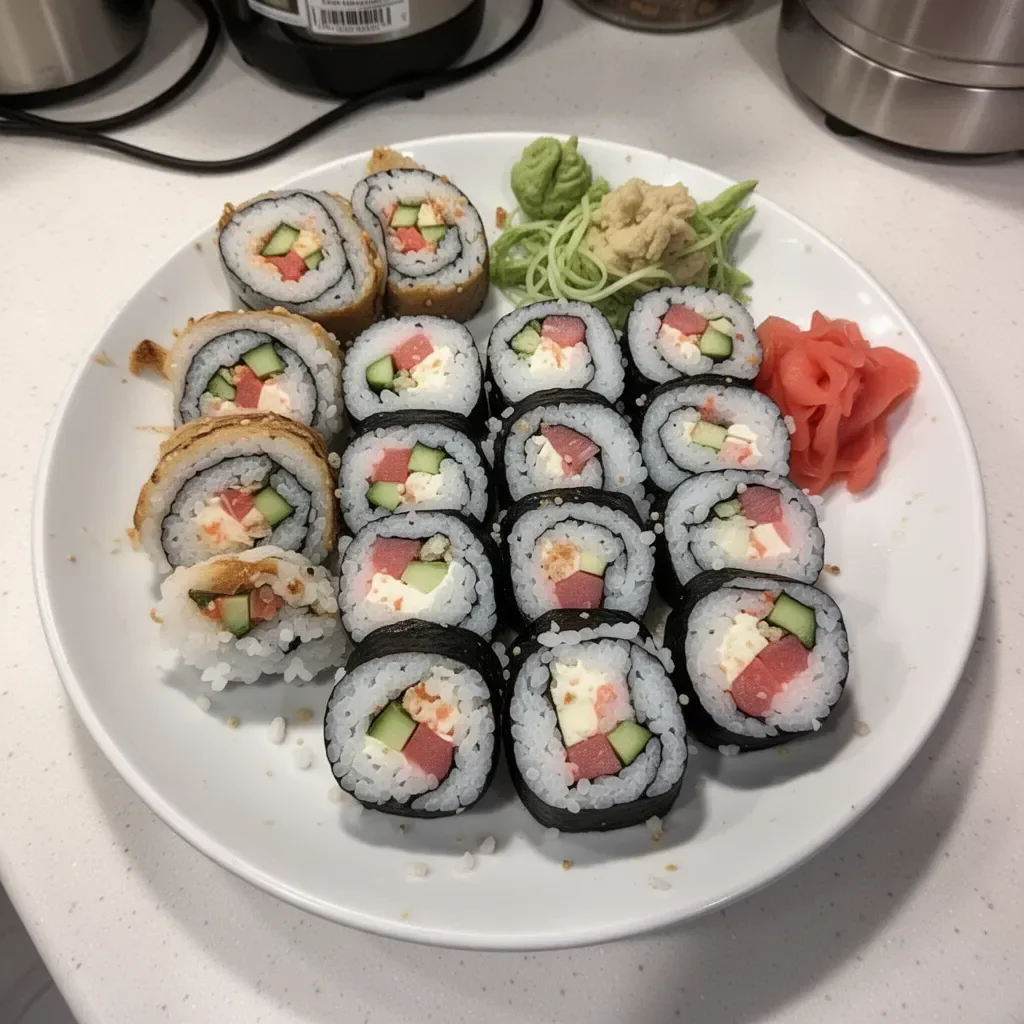
Serving and Presentation of Crunchy Sushi Roll
Serving/presentation
Serving your crunchy roll sushi is as important as making it. Presentation enhances the overall experience. Start with a clean cutting board, and arrange the sushi on a rectangular or circular plate. A simple garnish of pickled ginger and a small bowl of soy sauce will elevate your presentation.
Consider adding additional garnishes like sesame seeds or sliced green onions for a pop of color and extra flavor. Incorporate a touch of artistry by arranging the sushi in a fan shape or stacking them neatly in a row.
Pairings/storage
Enjoy crunchy roll sushi with a serving of soy sauce for dipping and pickled ginger to cleanse the palate. If you have leftovers, store them in an airtight container in the refrigerator for up to a day. Note that sushi is best enjoyed fresh, so try to consume it the same day for optimal taste and texture.
If the sushi becomes dry after storing, consider lightly misting it with water before consuming.
Creating your own crunchy roll sushi brings not just satisfaction but also a sense of accomplishment. Enjoy your culinary adventure with every roll crafted!
Craft this personalized sushi delight by giving attention to detail. Celebrate every crunch and bring smiles to your dining table with these vibrant sushi rolls.
Print
Crunchy Roll Sushi
- Prep Time: 30 minutes
- Cook Time: 20 minutes
- Total Time: 50 minutes
- Yield: 4 servings
- Category: Main Course
- Method: Frying
- Cuisine: Japanese
- Diet: Vegetarian
Description
Delight in making Crunchy Roll Sushi, featuring crispy textures and fresh ingredients that turn sushi-making into a fun celebration.
Ingredients
- 2 cups (400g) sushi rice
- 1/3 cup (80ml) rice vinegar
- 2 tablespoons (25g) sugar
- 1 teaspoon salt
- 4 nori seaweed sheets
- 1 cucumber (julienned)
- 1 avocado (sliced)
- 1/2 cup (50g) tempura flakes
- 1 cup (100g) panko breadcrumbs
- 2 tablespoons vegetable oil
- 1 tablespoon soy sauce
- 1 teaspoon maple syrup or agave nectar
- Soy sauce and pickled ginger for serving
Instructions
- Prepare the sushi rice by rinsing and soaking it for thirty minutes. Cook according to package instructions.
- Combine rice vinegar, sugar, and salt in a bowl, mixing until dissolved.
- Once the rice has cooled slightly, gently combine it with the rice vinegar mixture, folding it carefully.
- Prepare the crunchy crust by mixing the panko breadcrumbs with vegetable oil. This creates a golden, crispy texture.
- Lay out a nori sheet on a bamboo mat, shiny side down. Wet your hands and spread an even layer of sushi rice over the nori, leaving about an inch at the top edge.
- Add a line of julienned cucumber and avocado in the center of the rice.
- Sprinkle a generous amount of tempura flakes over the veggies, enhancing the crunchy factor.
- Carefully roll the sushi away from you, using the mat to guide it. Press gently but firmly as you go.
- Seal the edge with a bit of water.
- Coat the outside of the roll with the panko mixture and pan-fry in a skillet over medium heat until golden brown.
- Slice the roll into bite-sized pieces.
Notes
Ensure your hands are damp while handling the sushi rice to prevent sticking. Use quality ingredients for the best flavor.
