
📑 Table of Contents ▶
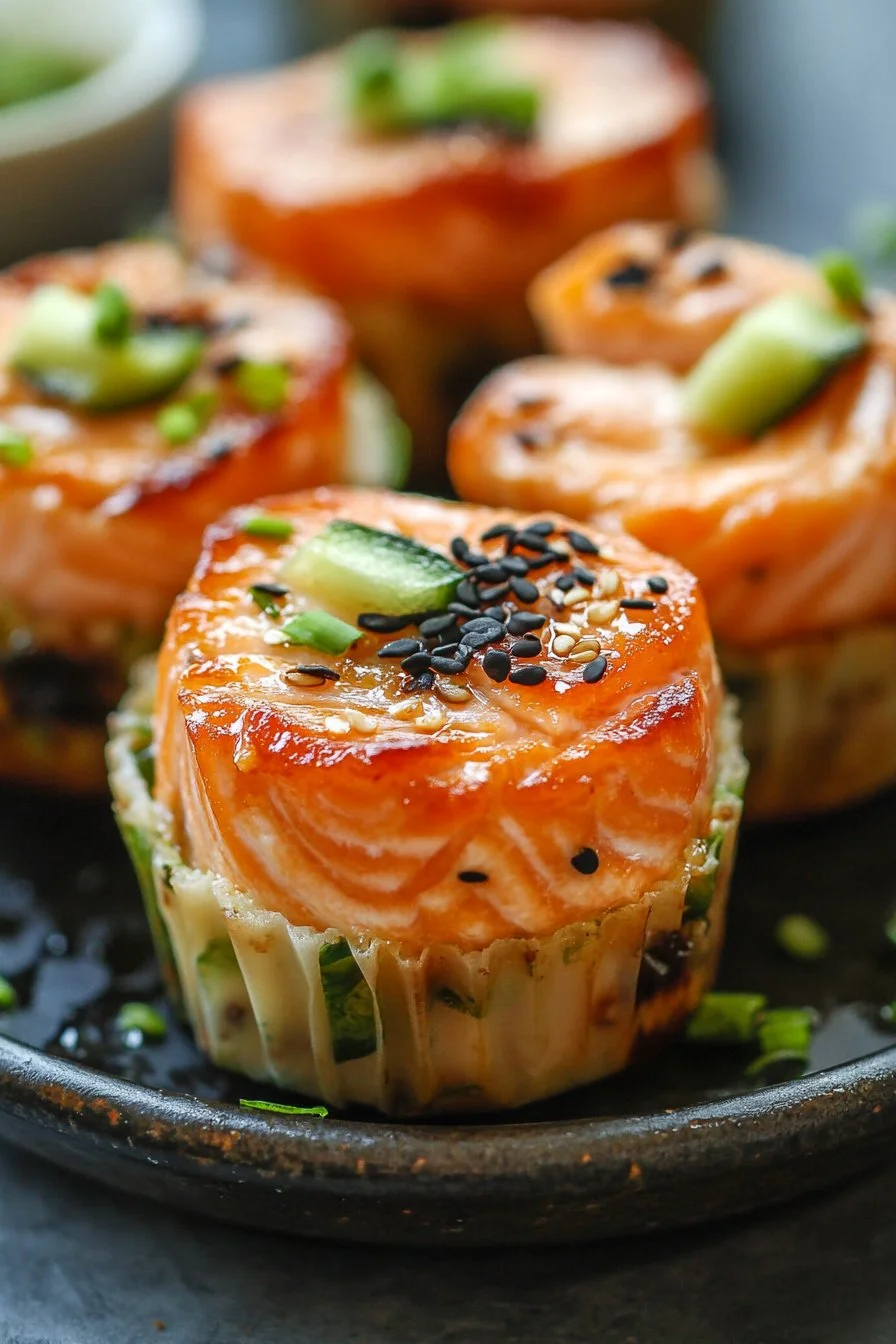
Viral Easy Baked Salmon Sushi Bake Cups
The aroma of freshly baked salmon fills the kitchen, transporting me back to my childhood. My family often gathered around a sushi platter, indulging in vibrant flavors and the tactile joy of rolling sushi together. Those moments sparked my love for seafood and inspired me to create something just as delightful yet easier to prepare.
Baked salmon sushi bake cups blend that beloved sushi experience with the simplicity of a one-pan dish. With layers of savory sushi rice and luscious salmon, these cups appeal to seasoned sushi lovers and newcomers alike. They embody a delightful twist on traditional sushi, making dinner fun, interactive, and, most importantly, utterly delicious.
As I began crafting this recipe, I focused on flavor dynamics and texture combinations. The creamy goodness of Kewpie mayo, the kick from sriracha, and the unique nori crispness make these bake cups irresistible. Perfect for a weeknight meal or a gathering with friends, these baked sushi cups deliver joy in every bite.
Baked Salmon Sushi Bake Cups
Fundamentals
Creating baked salmon sushi bake cups starts with the essentials: cooked sushi rice, fresh salmon, and simple but flavorful seasonings. Start with quality sushi rice—jasmine or another short-grain variety works well. This rice provides the perfect consistency, holding together to form a satisfying base for the cups.
Next, the main star: salmon. Choose an 8 oz, skinless piece of salmon, cubed into bite-size pieces, ensuring even cooking throughout. Each bite should burst with flavor, and the choice of garnishes can elevate the taste even further.
This dish relies on a simple balance of flavors. Rice vinegar adds tanginess, while mirin contributes mild sweetness. Kewpie mayo and sriracha lend richness and spice, harmonizing with the other elements.
Preparation/setup
Before diving into assembly, let’s prepare the ingredients. Start by cooking the sushi rice according to package instructions. This typically involves rinsing the rice to remove excess starch, allowing it to become sticky yet fluffy—a crucial texture for sushi.
After the rice is cooked and cooled slightly, it’s time to flavor it. Combine rice vinegar, mirin, and a sweetener such as agave to create a delightful mixture. Gently fold this into the rice to ensure even distribution without breaking the grains.
Next, shift the focus to the salmon. Cut the salmon into uniform cubes for consistent cooking. Marinating it in soy sauce not only enhances flavor but also ensures moisture, resulting in a tender texture. Allow the fish to soak for about 15 minutes, soaking up that savory goodness.
With the rice flavored and the salmon marinated, gather your roasted nori seaweed. Cutting it into squares sets the stage for assembly, ensuring you have everything ready for the final steps.
Ingredients
- 2 cups of cooked sushi rice (jasmine or any short-grain rice will work)
- 2 tbsp rice vinegar
- 1 tbsp mirin
- 1 tbsp of sweetener (agave works well)
- 6 pieces roasted nori seaweed (cut into 4 squares)
- 1 piece of salmon (8 oz, skinless, cubed)
- 2 tbsp of soy sauce
- 2 tbsp of Kewpie mayo
- 2 tbsp sriracha
Garnish Ideas (optional):
- Sliced avocado
- Green onions
- Furikake
- Extra Kewpie mayo
- Extra sriracha
- Sesame seeds
Directions
- Preparing the Salmon: Begin by cutting the salmon into 1-inch cubes, ensuring even cooking throughout the process.
- Marinating the Salmon: Combine the cubed salmon with soy sauce. Let it marinate for about 15 minutes to infuse your dish with savory flavor.
- Flavoring the Sushi Rice: Mix rice vinegar, mirin, and the sweetener in a bowl. Fold this mixture into the cooked sushi rice gently to avoid breaking the grains.
- Assembling the Salmon Sushi Bake Cup: Preheat your oven to 375°F (190°C). In an oven-safe dish, layer the flavored sushi rice at the bottom. Top with the marinated salmon cubes. Drizzle Kewpie mayo and sriracha over the top. Use a spoon to swirl the sauces for a beautiful marbled effect.
- Baking and Garnishing: Place the dish in the oven and bake for about 20-25 minutes, until the salmon is cooked through. Add garnish on top right when it’s out of the oven for freshness.
- Serve and Enjoy: Allow the dish to cool for a few minutes. Use the nori squares to scoop out portions or serve it on plates. Either way, these adorable sushi bake cups promise satisfaction.
Exploring the Art of Sushi Bake Cups
Technique
Mastering tomato bake sushi cups lies in the technique. Each step combines meticulous preparation with an eye for detail. When performing the rice preparation, rinsing ensures a perfect sticky consistency, while marinating the salmon allows flavors to penetrate deeply.
Take care while mixing the rice and vinegar mixture. Gentle folding is crucial to maintain the rice’s texture, as breaking the grains can lead to mushy results. Precision in layering also matters—ensure even distribution of salmon and condiments for balanced flavor in each bite.
Tips/tricks
A few tricks can elevate your baked salmon sushi cups. When laying out the rice, use wet hands to prevent sticking, making it easier to create an even layer. Choosing fresh salmon makes a noticeable difference in taste and quality.
Consider varying the garnishes based on personal preferences. Sliced avocado adds creaminess, while furikake introduces extra umami and texture. Sriracha can be drizzled generously for an added kick, while sesame seeds provide a pleasing crunch.
Allow the final dish to rest after removing it from the oven. This brief cooling period allows the flavors to meld beautifully. Enjoying the baked cups fresh from the oven enhances the experience, ensuring the perfect melding of flavors and textures.
Perfecting Your Baked Salmon Sushi Cups
Perfecting results
Working toward perfectly baked salmon sushi cups means focusing on even cooking and balanced flavors. Keep an eye on the oven to avoid overcooking the salmon. Cooking time may vary depending on your oven, so check for flakiness in the salmon as a sign of doneness.
Taste testing during the preparation stages ensures everything aligns with your flavor preferences. Fiddling with sauce proportions might achieve the perfect balance. Kewpie mayo and sriracha enhance each ingredient, making every bite delightful.
Troubleshooting/variations
If the salmon appears overcooked, lower the oven temperature slightly next time and adjust cooking times accordingly. If the rice is too sticky, maintain a careful balance of water throughout cooking, and consider rinsing thoroughly beforehand to achieve the desired texture.
Try alternative proteins or seafood, such as cooked shrimp or tuna, for varied flavors. Feel free to swap out or add different sauces to create distinct flavor profiles. This versatility allows you to personalize the recipe, making it your own.
Presentation and Beyond with Sushi Bake Cups
Serving/presentation
Presentation plays a significant role in enjoyment. Use vibrant garnish to color the dish, enhancing visual appeal while introducing fresh flavors. Create a centerpiece with a platter featuring small bowls of soy sauce, extra mayo, or sriracha for dipping.
Consider using individual ramekins for serving, giving each guest their own baked sushi cup. This approach not only enhances presentation but adds a personal touch to the dining experience.
Pairings/storage
These baked salmon sushi cups pair well with light salads or vegetable sides, balancing the meal. Keep sides simple, letting the salmon sushi bake shine. Consider quick pickled vegetables for a refreshing crunch alongside your meal.
If you have leftovers, seal them in an airtight container. They can last for a couple of days in the refrigerator. Reheating gently in the oven ensures the salmon remains tender and flavorful, providing a quick, satisfying meal on another busy day.
Conclusion
Baked salmon sushi bake cups bring together the joy of cooking and the delight of sharing food with others. Each step leads to an accessible, delicious meal that everyone can enjoy. Whether for an everyday dinner or a special occasion, these cups will surely impress with their flavor and presentation.
Print
Viral Easy Baked Salmon Sushi Bake Cups
- Prep Time: 15 minutes
- Cook Time: 25 minutes
- Total Time: 40 minutes
- Yield: 4 servings
- Category: Main Course
- Method: Baking
- Cuisine: Japanese
- Diet: Seafood
Description
Delightful baked salmon sushi bake cups combining savory sushi rice and luscious salmon, perfect for a weeknight meal or gatherings.
Ingredients
- 2 cups of cooked sushi rice (jasmine or any short-grain rice)
- 2 tbsp rice vinegar
- 1 tbsp mirin
- 1 tbsp of sweetener (agave works well)
- 6 pieces roasted nori seaweed (cut into 4 squares)
- 1 piece of salmon (8 oz, skinless, cubed)
- 2 tbsp of soy sauce
- 2 tbsp of Kewpie mayo
- 2 tbsp sriracha
Instructions
- Cut the salmon into 1-inch cubes for even cooking.
- Marinate the salmon with soy sauce for about 15 minutes.
- Mix rice vinegar, mirin, and the sweetener, then fold this mixture into the cooked sushi rice gently.
- Preheat oven to 375°F (190°C). Layer the flavored sushi rice in an oven-safe dish and top with marinated salmon cubes.
- Drizzle Kewpie mayo and sriracha over the top and swirl for a marbled effect.
- Bake for 20-25 minutes until the salmon is cooked through and garnish with optional toppings.
- Let cool slightly before serving with nori squares or on plates.
Notes
Use wet hands when handling rice to prevent sticking. Allow the dish to rest briefly after baking for the best flavor.
