
📑 Table of Contents ▶
- Part 1 — Crunchy Roll Sushi Fundamentals
- Fundamentals
- Preparation/setup
- Directions
- Part 2 — Perfecting the Technique of Crunchy Roll Sushi
- Technique
- Tips and Tricks
- Part 3 — Perfecting Crunchy Roll Sushi Results
- Perfecting results
- Troubleshooting and Variations
- Part 4 — Serving and Storing Crunchy Roll Sushi
- Serving and presentation
- Pairings and storage
Crunchy Roll Sushi
A childhood memory stands out vividly: a hot summer afternoon spent on the beach, feeling the sand between my toes while watching the waves crash against the shore. The sun warmed my skin as I eagerly bit into a crunchy roll sushi, fresh and vibrant, filled with flavors that danced in perfect harmony. That moment of joy made me fall in love with sushi, and I’ve been hooked ever since.
Creating crunchy roll sushi brings me back to those simple yet beautiful days. The process itself is a delightful journey, filled with colorful ingredients and textures. This sushi showcases a balance of creamy avocado, crisp cucumber, and savory crab sticks, all wrapped in delicate nori and crunchy panko. Each bite delivers a satisfying crunch, making it a favorite among friends and family.
Sharing this sushi recipe turns cooking into a festive occasion. Whether hosting a gathering or enjoying an intimate dinner, preparing crunchy roll sushi invites creativity and laughter into your kitchen. It encourages you to express your culinary flair and enjoy delightful flavors that resonate with those special summer days.
Part 1 — Crunchy Roll Sushi Fundamentals
Fundamentals
Crunchy roll sushi combines traditional and modern sushi-making techniques. Sushi rice serves as the canvas for a delicious masterpiece. It’s essential to use sushi rice, as its sticky texture holds everything together. The right preparation leads to a soft, flavorful base for your delicious fillings.
Fresh ingredients amplify the taste, so be sure to select quality nori sheets, ripe avocado, and crisp cucumbers. Crab sticks or imitation crab offer a savory bite that pairs beautifully with the rice and veggies. The addition of panko breadcrumbs introduces a satisfying crunch, elevating this sushi to new heights.
Preparation/setup
Preparing for sushi making can be enjoyable and straightforward. A bamboo mat is an indispensable tool for rolling the sushi tightly. Before starting, gather all ingredients and tools neatly to streamline the process.
Preparation involves washing the sushi rice thoroughly until the water runs clear. This crucial step removes excess starch, resulting in perfectly cooked rice. Once you cook the rice, seasoning it with a mixture of rice vinegar, sugar, and salt enhances its flavor and creates that desired sushi essence.
Ingredients
- 2 cups sushi rice
- 1/4 cup rice vinegar
- 1 tablespoon sugar
- 1 teaspoon salt
- Nori sheets
- 1 avocado, sliced
- 1 cucumber, julienned
- Crab sticks or imitation crab
- Panko breadcrumbs
- Soy sauce for serving
- Wasabi and pickled ginger (optional)
Directions
- Rinse the sushi rice under cold water until the water runs clear. Cook according to package instructions.
- In a small bowl, mix the rice vinegar, sugar, and salt until dissolved. Mix this with the cooked rice and let it cool.
- Place a nori sheet on a bamboo mat. Spread a thin layer of sushi rice over the nori, leaving a small border at the top edge.
- Arrange slices of avocado, cucumber, and crab sticks along the bottom edge of the rice.
- Roll the sushi tightly using the bamboo mat, applying gentle pressure.
- Once rolled, slice into bite-sized pieces.
- For a crunchy texture, dip the rolls in panko breadcrumbs and briefly fry them.
- Serve with soy sauce, wasabi, and pickled ginger.
Part 2 — Perfecting the Technique of Crunchy Roll Sushi
Technique
Rolling sushi takes a bit of practice, but it’s rewarding. Ensuring the right amount of pressure while rolling ensures that the sushi stays intact. Too loose and the roll might fall apart, too tight, and the filling will squeeze out. Experiment with the pressure as you practice.
Using a sharp knife helps achieve clean slices of sushi, preventing the ingredients from spilling out. Rinse the knife between cuts to maintain sharpness and keep your pieces looking neat.
Tips and Tricks
Start with a workspace that allows you enough room to maneuver. Organizational matters can ease the sushi-making experience, allowing you to focus on the art of rolling.
Prepare all fillings ahead of time. This preparation ensures that the ingredients are fresh and allows for proper assembly. When making a larger batch, assemble the rolls in smaller portions to maintain quality and freshness.
Part 3 — Perfecting Crunchy Roll Sushi Results
Perfecting results
The goal of sushi making lies in achieving balance. Aim for a satisfying ratio of rice to filling. Too much rice can overwhelm the other flavors, while too little can result in a bland bite. Strive for balance in each roll by adjusting the ingredient amounts to personal preferences.
Don’t be afraid to experiment with fillings! Substitute other vegetables or proteins, customizing the sushi to your liking. This versatility enhances creativity while keeping the sushi exciting.
Troubleshooting and Variations
If the rice feels too sticky or too dry, adjust your cooking method. Ensure you follow package instructions accurately. If necessary, add a bit more water when cooking to achieve that fluffy texture.
For those who enjoy a kick, a drizzle of sriracha adds a delightful heat. Alternatively, try different sushi toppings, such as sesame seeds or thinly sliced scallions.
Part 4 — Serving and Storing Crunchy Roll Sushi
Serving and presentation
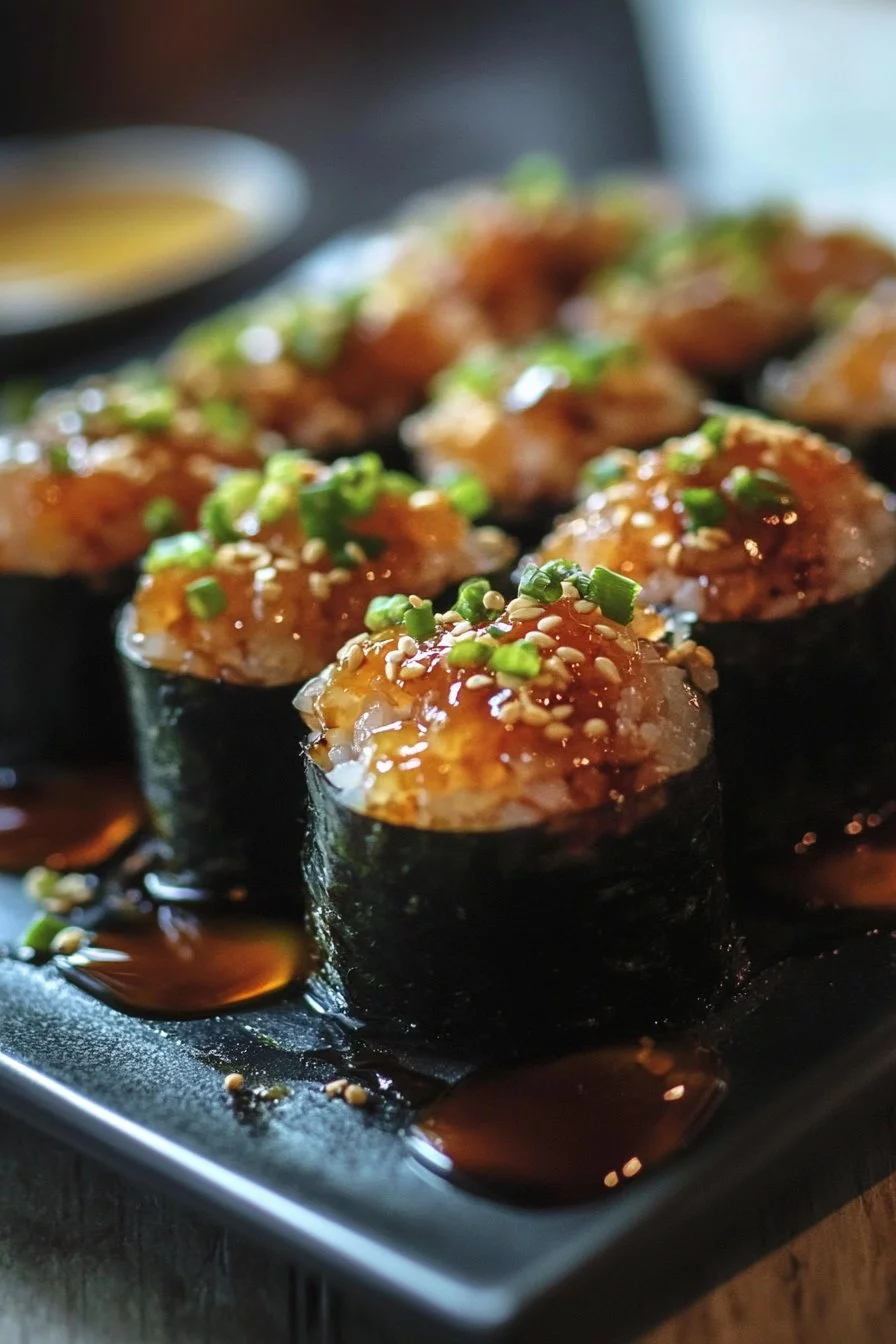
The presentation of crunchy roll sushi enhances the dining experience. Arrange the sliced sushi on a beautiful platter, highlighting the vibrant colors of ingredients. Garnish with a sprinkle of sesame seeds or finely chopped green onions for a touch of elegance.
Adding small bowls of soy sauce, wasabi, and pickled ginger not only provides complementary flavors but also enhances the presentation. This setup allows guests to serve themselves and enjoy customizing their sushi experience.
Pairings and storage
Pair your crunchy roll sushi with an assortment of sides. Serve it alongside a fresh salad, miso soup, or a light appetizer. These dishes offer a delightful contrast, enriching the meal experience without overshadowing the sushi.
Store leftover sushi in an airtight container in the refrigerator for up to 24 hours. The texture of the rice might soften, but the flavors remain. Enjoy the last bites or save them for a quick lunch the next day.
The process of crafting crunchy roll sushi offers a perfect blend of tradition and creativity. It brings together fresh, flavorful ingredients in a delightful way that celebrates the joy of cooking and sharing food with others.
Print
Crunchy Roll Sushi
- Prep Time: 20 minutes
- Cook Time: 30 minutes
- Total Time: 50 minutes
- Yield: 4 servings
- Category: Main Course
- Method: Rolling
- Cuisine: Japanese
- Diet: Seafood
Description
A delightful sushi roll filled with creamy avocado, crisp cucumber, and savory crab sticks, all wrapped in nori and crunchy panko for a satisfying texture.
Ingredients
- 2 cups sushi rice
- 1/4 cup rice vinegar
- 1 tablespoon sugar
- 1 teaspoon salt
- Nori sheets
- 1 avocado, sliced
- 1 cucumber, julienned
- Crab sticks or imitation crab
- Panko breadcrumbs
- Soy sauce for serving
- Wasabi and pickled ginger (optional)
Instructions
- Rinse the sushi rice under cold water until the water runs clear. Cook according to package instructions.
- In a small bowl, mix the rice vinegar, sugar, and salt until dissolved. Mix this with the cooked rice and let it cool.
- Place a nori sheet on a bamboo mat. Spread a thin layer of sushi rice over the nori, leaving a small border at the top edge.
- Arrange slices of avocado, cucumber, and crab sticks along the bottom edge of the rice.
- Roll the sushi tightly using the bamboo mat, applying gentle pressure.
- Once rolled, slice into bite-sized pieces.
- For a crunchy texture, dip the rolls in panko breadcrumbs and briefly fry them.
- Serve with soy sauce, wasabi, and pickled ginger.
Notes
Experiment with different fillings to personalize your sushi. Ensure to balance rice and filling for optimal flavor.
